When setting up a projector for your home theater or presentation space, one of the most important considerations is how to position the projector for the desired screen size. The size of the room plays a critical role in determining the ideal projector throw distance and placement to achieve an optimal viewing experience.
In this comprehensive guide, we'll dive deep into understanding how room dimensions affect projector throw distance calculations and explore various projector placement options to help you create the perfect setup for your space. Whether you're working with a small living room or a spacious conference hall, understanding the relationship between room size and projector throw distance is essential for achieving the best possible image quality and immersive viewing.
We'll also introduce the concept of Projector Throw Distance for room size and explain its significance in creating a stunning visual display. Additionally, we'll discuss how AV system integration software can simplify the process of calculating throw distances and selecting the ideal projector for your specific room requirements.
So, let's embark on this journey to uncover the secrets of projector placement and learn how to position a projector for larger screen sizes while considering the unique characteristics of your room.
Understanding Projector Throw Distance
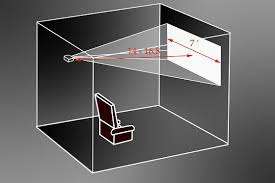
Projector throw distance refers to the distance between the projector's lens and the projection screen. It is a crucial factor in determining the size of the projected image and the overall image quality. The throw distance is directly proportional to the screen size—the farther the projector is from the screen, the larger the image will be.
To calculate the throw distance, you need to consider two primary factors:
- Projector's throw ratio
- Desired screen size
The throw ratio is a specification provided by the projector manufacturer, indicating the relationship between the throw distance and the screen width. For example, a throw ratio of 1.5:1 means that for every 1.5 feet of distance between the projector and the screen, the image width will be 1 foot.
To determine the throw distance, use this formula: Throw Distance = Screen Width × Throw Ratio
For instance, if you have a screen width of 10 feet and a projector with a throw ratio of 1.5:1, the throw distance would be: Throw Distance = 10 feet × 1.5 = 15 feet
Understanding the throw distance is essential for ensuring that your projector is placed at the optimal distance from the screen to achieve the desired image size and maintain image clarity.
The Impact of Room Size on Projector Placement
The size of your room plays a significant role in determining the ideal projector placement and screen size. Let's explore how room dimensions affect projector throw distance and placement choices.
Small Rooms (Less than 150 square feet)
In smaller rooms, such as home offices or compact living rooms, you'll need to consider the limited space available for projector placement. Short-throw projectors are an excellent option for these spaces, as they can be positioned closer to the screen while still delivering a large image.
Short-throw projectors typically have a throw ratio of less than 1:1, meaning they can be placed very close to the screen. For example, a short-throw projector with a throw ratio of 0.5:1 can project a 100-inch image from just 5 feet away.
When setting up a projector in a small room, consider the following:
- Use a short-throw or ultra-short-throw projector to minimize the required throw distance
- Position the projector as close to the screen as possible to maximize screen size
- Ensure adequate ventilation around the projector to prevent overheating
- Consider using a ceiling mount or a low-profile projector stand to save space
Medium Rooms (150-300 square feet)
For medium-sized rooms, such as larger living rooms or small conference rooms, you have more flexibility in terms of projector placement and screen size. Standard throw projectors with a throw ratio between 1:1 and 2:1 are suitable for these spaces.
To calculate the throw distance for a medium-sized room, use the formula mentioned earlier: Throw Distance = Screen Width × Throw Ratio
For example, if you have a screen width of 10 feet and a projector with a throw ratio of 1.5:1, the throw distance would be 15 feet.
When setting up a projector in a medium-sized room, consider the following:
- Use a standard throw projector with a throw ratio between 1:1 and 2:1
- Position the projector at the calculated throw distance to achieve the desired screen size
- Ensure the projector is placed at the correct height to avoid image distortion (keystone effect)
- Consider using a ceiling mount for a clean and unobtrusive installation
Large Rooms (More than 300 square feet)
In large rooms, such as spacious home theaters or conference halls, you have the most flexibility in terms of projector placement and screen size. Long-throw projectors with a throw ratio greater than 2:1 are ideal for these spaces, as they can project large images from a considerable distance.
To calculate the throw distance for a large room, use the same formula: Throw Distance = Screen Width × Throw Ratio
For example, if you have a screen width of 20 feet and a projector with a throw ratio of 2.5:1, the throw distance would be: Throw Distance = 20 feet × 2.5 = 50 feet
When setting up a projector in a large room, consider the following:
- Use a long-throw projector with a throw ratio greater than 2:1
- Position the projector at the calculated throw distance to achieve the desired screen size
- Ensure the projector is placed at the correct height and angle to maintain image geometry
- Consider using a motorized zoom lens to fine-tune the image size and position
- Use a sturdy ceiling mount or projector lift to securely install the projector
Projector Throw Distance for Room Size
Understanding the concept of Projector Throw Distance for room size is crucial in creating an optimal viewing experience. The throw distance must be carefully calculated based on the room dimensions to ensure that the projected image fits the screen perfectly and maintains optimal image quality.
When considering the throw distance for your room size, keep the following factors in mind:
- Room dimensions (length, width, and height)
- Desired screen size
- Projector's throw ratio
- Projector placement options (floor, table, or ceiling)
By taking these factors into account, you can determine the ideal throw distance for your specific room size and projector setup. This will help you achieve the perfect balance between screen size and image quality, ensuring that your audience enjoys a captivating and immersive visual experience.
How to Position a Projector for Larger Screen Sizes
Achieving a larger screen size is a common goal for many projector enthusiasts and AV professionals. To successfully project a large image, you need to understand how to position a projector for larger screen sizes while considering the room dimensions and projector specifications.
Here are some tips for positioning your projector to achieve a larger screen size:
- Choose a projector with a suitable throw ratio: Select a projector with a throw ratio that allows for a larger screen size at the desired throw distance. Long-throw projectors are often preferred for larger screens.
- Maximize the throw distance: Position the projector as far away from the screen as possible within the room's constraints. A longer throw distance will result in a larger screen size.
- Use a higher-resolution projector: Opt for a projector with a higher native resolution, such as 4K or 1080p, to maintain image clarity and sharpness on larger screens.
- Employ a motorized zoom lens: A motorized zoom lens allows you to fine-tune the image size and position without physically moving the projector, making it easier to achieve the perfect large-screen setup.
- Consider using a projector lift or ceiling mount: Mounting the projector on the ceiling or using a motorized lift can provide more flexibility in positioning the projector for larger screen sizes while keeping the installation neat and tidy.
By following these tips and considering the specific characteristics of your room and projector, you can successfully position your projector to achieve an impressive large-screen viewing experience.
The Role of AV System Integration Software
AV system integration software plays a crucial role in simplifying the process of designing and setting up projector systems for various room sizes. These software tools offer a range of features that help AV professionals and enthusiasts calculate throw distances, select the appropriate projector, and optimize the overall system performance.
Some key benefits of using AV system integration software include:
- Throw distance calculators: Many AV system integration software packages include built-in throw distance calculators that automatically determine the ideal projector placement based on the room dimensions, screen size, and projector specifications.
- Projector selection tools: These software tools often provide a comprehensive database of projectors, allowing users to easily compare and select the best projector for their specific needs based on factors such as throw ratio, resolution, brightness, and contrast ratio.
- 3D visualization and modeling: Advanced AV system integration software offers 3D visualization and modeling capabilities, enabling users to create virtual representations of their room and projector setup. This feature helps in planning the perfect projector placement and identifying potential issues before the actual installation.
- System performance optimization: AV system integration software can also help optimize the overall system performance by providing guidance on screen material selection, projector settings, and room acoustics, ensuring the best possible image and sound quality.
By leveraging the power of AV system integration software, you can streamline the process of designing and installing projector systems, saving time and effort while achieving optimal results for any room size.
Common Challenges and Solutions
When setting up a projector in a room of any size, you may encounter various challenges that can affect the image quality and overall viewing experience. Let's discuss some common challenges and their solutions:
Challenge 1: Insufficient throw distance
If your room size is limited and you cannot achieve the desired screen size due to insufficient throw distance, consider the following solutions:
- Use a short-throw or ultra-short-throw projector that can project a large image from a short distance
- Opt for a smaller screen size that fits the available throw distance
- Rearrange the room layout to accommodate a longer throw distance, if possible
Challenge 2: Image distortion (keystone effect)
When the projector is not positioned perpendicular to the screen, the image may appear distorted, with the top or bottom of the image being wider than the other. To resolve this issue:
- Adjust the projector's keystone correction settings to compensate for the distortion
- Physically reposition the projector to ensure it is perpendicular to the screen
- Use a projector mount with adjustable angles to fine-tune the projector's position
Challenge 3: Ambient light interference
Excessive ambient light in the room can wash out the projected image, reducing contrast and clarity. To mitigate this problem:
- Use a projector with high brightness (lumens) to counteract the ambient light
- Install light-blocking curtains or shades to control the amount of light entering the room
- Position the screen away from direct light sources, such as windows or lamps
- Apply an ambient light rejecting (ALR) screen material that reflects ambient light while preserving the projected image
Challenge 4: Projector noise
Some projectors, especially those with high brightness, can generate significant noise due to the cooling fans. To minimize projector noise:
- Choose a projector with low noise levels (measured in decibels)
- Position the projector away from the audience or use a sound-absorbing enclosure
- Adjust the projector's fan settings, if available, to reduce noise levels
- Use a projector hush box or a noise-reducing projector enclosure to contain the sound
By addressing these common challenges with the appropriate solutions, you can ensure that your projector setup delivers the best possible image quality and viewing experience in any room size.
User Queries and Answers
In this section, we'll address some frequently asked questions about projector throw distance and placement for different room sizes.
Q1: What is the ideal throw distance for a 100-inch screen in a small room?
A1: The ideal throw distance for a 100-inch screen in a small room depends on the projector's throw ratio. For a short-throw projector with a throw ratio of 0.5:1, the ideal throw distance would be approximately 5 feet. However, for a standard throw projector with a ratio of 1.5:1, the throw distance would be around 15 feet.
Q2: Can I use a long-throw projector in a small room?
A2: While it is possible to use a long-throw projector in a small room, it may not be the most practical solution. Long-throw projectors require a significant distance between the projector and the screen to project a large image, which may not be feasible in a small room. In such cases, it is better to opt for a short-throw or ultra-short-throw projector that can project a large image from a shorter distance.
Q3: How do I calculate the throw distance for my specific projector and room size?
A3: To calculate the throw distance for your projector and room size, you'll need to know your projector's throw ratio and the desired screen width. Use the formula: Throw Distance = Screen Width × Throw Ratio. For example, if your desired screen width is 8 feet and your projector has a throw ratio of 1.2:1, the throw distance would be 9.6 feet (8 feet × 1.2).
Q4: What is the maximum screen size I can achieve in a medium-sized room?
A4: The maximum screen size you can achieve in a medium-sized room depends on the room dimensions, projector throw ratio, and lens capabilities. As a general rule, you can achieve a larger screen size by using a projector with a longer throw ratio or a zoom lens that allows for a larger image at a given distance. However, it's essential to ensure that the projector's brightness and resolution are sufficient to maintain image quality on a larger screen.
Q5: Can I use a standard throw projector in a large room?
A5: Yes, you can use a standard throw projector in a large room, provided that the room dimensions allow for the required throw distance. Standard throw projectors typically have a throw ratio between 1:1 and 2:1, which means they need a moderate distance from the screen to project a large image. However, in very large rooms, you may need to consider using a long-throw projector with a throw ratio greater than 2:1 to achieve the desired screen size.
Q6: How do I ensure the projector is positioned at the correct height?
A6: To ensure the projector is positioned at the correct height, follow these steps:
- Determine the vertical offset: Measure the distance from the center of the projector's lens to the bottom edge of the projected image. This distance is known as the vertical offset.
- Calculate the ideal projector height: Add half of the screen height to the vertical offset to determine the ideal height for the center of the projector lens.
- Use a projector mount or adjustable stand: Position the projector at the calculated height using a ceiling mount, wall mount, or adjustable projector stand.
- Fine-tune the projector's vertical lens shift: If your projector has vertical lens shift, use this feature to fine-tune the image position without physically moving the projector.
Q7: What screen material is best for a room with ambient light?
A7: In a room with ambient light, it's best to use an ambient light rejecting (ALR) screen material. ALR screens are designed to reflect ambient light away from the viewer's eyes while preserving the quality of the projected image. This helps maintain higher contrast and clarity, even in the presence of ambient light. Some popular ALR screen materials include:
- Black Diamond by Screen Innovations
- Parallax by Elite Screens
- Slate by Stewart Filmscreen
- Phantom HALR by Draper
Q8: How can I minimize projector noise in my room?
A8: To minimize projector noise in your room, consider the following options:
- Choose a projector with low noise levels: Look for projectors with noise levels below 30 decibels (dB) for the best results.
- Adjust the projector's settings: Some projectors offer different operating modes or fan settings that can reduce noise levels. Refer to your projector's manual for specific instructions.
- Use a projector hush box: A hush box is a soundproof enclosure that contains the projector and helps reduce the noise emitted by the unit.
- Install sound-absorbing materials: Place sound-absorbing panels or curtains around the projector to help dampen the noise.
- Position the projector away from the audience: Mounting the projector further away from the seating area can help reduce the perceived noise level.
By addressing these common user queries, we hope to provide valuable insights and solutions for achieving the perfect projector setup in any room size.
Case Studies
To better illustrate how room size impacts projector throw distance and placement choices, let's explore two real-world case studies.
Case Study 1: Home Theater in a Small Living Room
John and Sarah wanted to create a home theater experience in their small living room, which measured 12 feet wide by 15 feet long. They desired a screen size of around 100 inches to provide an immersive viewing experience.
Given the limited space, they opted for a short-throw projector with a throw ratio of 0.5:1. Using the throw distance formula (Throw Distance = Screen Width × Throw Ratio), they calculated the required throw distance:
Throw Distance = (100 inches ÷ 12 inches/foot) × 0.5 = 4.17 feet
To accommodate the short throw distance, John and Sarah placed the projector on a low-profile media console just 4.2 feet away from the wall where they installed a 100-inch ALR screen. The ALR screen helped maintain image quality by rejecting ambient light from nearby windows and lamps.
By choosing a short-throw projector and utilizing an ALR screen, John and Sarah successfully created a stunning home theater setup in their small living room, proving that room size limitations can be overcome with the right projector selection and placement.
Case Study 2: Conference Room Presentation Setup
A medium-sized company needed to set up a projector in their 20 feet wide by 30 feet long conference room for presentations and meetings. The desired screen size was 150 inches to ensure that all attendees could easily view the content.
The company's AV team decided to use a standard throw projector with a throw ratio of 1.5:1. Applying the throw distance formula, they determined the required throw distance:
Throw Distance = (150 inches ÷ 12 inches/foot) × 1.5 = 18.75 feet
To achieve the 18.75-foot throw distance, the team installed the projector on the ceiling using a sturdy mount. They positioned the projector perpendicular to the screen and fine-tuned the image using the projector's lens shift and keystone correction features.
The conference room's lighting system was designed to provide optimal viewing conditions, with dimmable lights and window shades to control ambient light. The AV team also installed a high-quality motorized projection screen with a matte white surface to ensure excellent image quality and easy operation.
By carefully calculating the throw distance, selecting the appropriate projector, and optimizing the room conditions, the company created a professional and effective presentation setup that accommodated their medium-sized conference room.
These case studies demonstrate how understanding the relationship between room size, projector throw distance, and placement choices can lead to successful projector installations in various environments.
Conclusion
In conclusion, room size plays a crucial role in determining the optimal projector throw distance and placement for achieving the desired screen size and image quality. By understanding the key factors, such as projector throw ratio, room dimensions, and screen size, you can make informed decisions when setting up a projector in any space.
Throughout this comprehensive guide, we've explored the impact of room size on projector placement, covering small, medium, and large rooms. We've also discussed the importance of projector throw distance for room size and provided tips on how to position a projector for larger screen sizes.
Additionally, we've highlighted the role of AV system integration software in simplifying the process of designing and installing projector systems, as well as addressed common challenges and their solutions. The user queries and case studies provided further insights into real-world applications of projector throw distance and placement principles.
By applying the knowledge and techniques presented in this guide, you'll be well-equipped to create stunning and immersive projector setups in any room size. Remember to consider factors such as ambient light control, screen material selection, and projector noise reduction to optimize your viewing experience further.
As technology continues to advance, staying informed about the latest projector innovations and best practices will help you stay ahead of the curve in creating captivating visual displays. Whether you're a home theater enthusiast or an AV professional, understanding the intricacies of projector throw distance and placement will enable you to deliver outstanding results in any project you undertake.