
CYC lights are essential for creating smooth, uniform, and professional stage lighting for theatre, concerts, film sets, and events. Whether you are illuminating a cyclorama backdrop or designing complex stage washes, the right setup ensures that your performance space looks visually stunning and professional. Rasha Professional - professional stage lighting and manufacturer provides high-quality CYC lights and stage lighting solutions trusted by technicians and production teams worldwide.
In this guide, we will take you through the step-by-step process of setting up CYC lights, covering everything from planning your stage layout to troubleshooting common issues. By the end of this guide, you will have the knowledge to install, configure, and optimize your stage lighting like a professional.
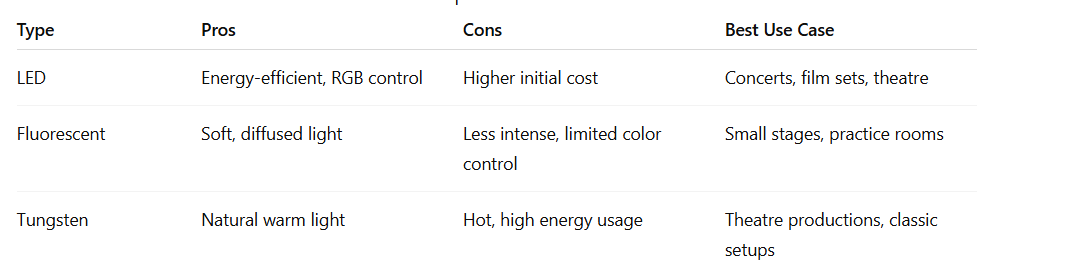
1. Understanding CYC Lights
Before you start setting up, it is important to understand what CYC lights are and how they function. CYC lights are specialized fixtures designed to provide even illumination across a cyclorama or backdrop. They are widely used in stage productions to create uniform washes of light without hotspots or shadows.
Types of CYC Lights
LED CYC Lights
- Energy-efficient, low heat emission
- Available in RGB for color mixing
- Longer lifespan than other types
- Ideal for long productions and film sets
Fluorescent CYC Lights
- Provide soft, diffused light
- Lower intensity than LED but good for smaller stages
- Can be more difficult to control with DMX
Tungsten CYC Lights
- Traditional incandescent style
- Produce warm color temperature naturally
- Generate more heat and consume more power
2. Planning Your Stage Setup
Proper planning is critical before you start mounting lights. This ensures even coverage, prevents hotspots, and maximizes the performance of your CYC lights.
Step 1: Measure Your Stage
- Measure the width and height of your cyclorama or backdrop
- Note the distance from the front edge of the stage to the backdrop
- Consider the overall stage area that needs to be illuminated
Example:
For a stage measuring 20x30 ft with a 12 ft high cyclorama, you will likely need 6–8 LED CYC lights for even coverage.
Step 2: Determine Light Placement
- Place lights evenly across the width of the backdrop
- Maintain consistent height from the floor or rigging
- Ensure correct throw distance (distance from light to backdrop)
- Avoid pointing lights at angles that create hotspots
Tip:
- LED CYC lights often require a spacing of 4–6 feet apart for a standard stage.
- Ensure you have clearance for cables and safe mounting.
Step 3: Plan Power and DMX
- Map out power outlets and extension needs
- Determine DMX cable runs and daisy-chain paths
- Label cables for easy troubleshooting
Safety Tip:
Never overload power circuits. Always use surge protectors for stage setups.
3. Step-by-Step Setup Instructions
Setting up CYC lights involves careful attention to positioning, mounting, wiring, and testing.
Step 1: Unboxing and Inspection
- Check each fixture for damage
- Verify all accessories: brackets, clamps, power cables, DMX connectors
- Test lights individually before mounting
Tip:
Rasha Professional CYC lights come with pre-tested fixtures. Still, always inspect each unit to prevent issues during the show.
Step 2: Mounting CYC Lights
- Decide whether to mount on a floor stand or truss
- Use appropriate clamps or brackets for stability
- Ensure fixtures are secure to prevent accidents
Example:
For a medium-sized stage, floor mounting at the base of the cyclorama is common. For larger stages, overhead mounting on a truss provides cleaner visuals and eliminates shadows.
Step 3: Positioning and Angling
- Adjust tilt and pan for even light coverage
- Ensure overlap of light beams to avoid dark spots
- Maintain a consistent angle for a uniform wash
Diagram (Text Representation):
Backdrop Width: 30 ft
Lights: 6 LED CYC lights
Spacing: 5 ft apart
Angle: 45° downward tilt
Step 4: Connecting to Power and DMX
- Connect each fixture to power
- Daisy-chain DMX cables (in → out) for multi-light setups
- Assign DMX addresses (1–6 for 6 lights)
- Test signal with a DMX controller
Tip:
Label each fixture and cable for easy troubleshooting.
Step 5: Color and Intensity Adjustment
- Set base color temperature (3200K–5600K depending on production)
- Adjust intensity levels to match the desired mood
- Experiment with RGB mixing if using LED fixtures
Tip:
Soft blue washes are ideal for evening scenes, while amber and warm whites work for daylight or theatre productions.
Step 6: Testing and Troubleshooting
- Check for flickering or dead fixtures
- Adjust beam angles to remove hotspots
- Ensure uniform coverage across the cyclorama
Pro Tip:
Rasha Professional fixtures often include built-in DMX addressing and memory functions for quick scene recalls.
4. DMX Control and Configuration
DMX (Digital Multiplex) allows precise control of light intensity, color, and effects.
Step 1: Understanding DMX
- Each light is assigned a DMX address
- DMX controllers send signals to adjust fixtures
- Channels correspond to intensity, RGB, or other parameters
Step 2: Basic DMX Setup
- Connect your controller to the first fixture
- Daisy-chain remaining lights
- Set unique addresses for each light
- Test each channel individually
Tip:
For a 6-light LED setup:
- Light 1 → DMX 1
- Light 2 → DMX 2
- …up to Light 6 → DMX 6
Step 3: Creating Scenes
- Pre-program lighting scenes (fade-ins, color changes)
- Save scenes for recall during live events
- Combine intensity and color channels for dynamic effects
5. Tips for Optimal Lighting
- Blend Colors: Avoid harsh contrasts by blending RGB colors
- Maintain Even Spread: Overlap beams slightly to eliminate dark spots
- Avoid Shadows: Keep lights angled to minimize performer shadows on the backdrop
- Use Dimmers: Gradually fade in/out for smooth transitions
Example Setup by Rasha Professional:
- 6 LED CYC lights, DMX controlled, 3200K warm white wash, evenly spaced 5 ft apart, mounted on floor stands.
6. Common Issues and Troubleshooting
Issue 1: Flickering Lights
- Cause: Loose cable, incorrect DMX address, voltage fluctuations
- Solution: Check connections, verify DMX addresses, use surge protector
Issue 2: Uneven Spread
- Cause: Poor angle or spacing
- Solution: Reposition lights, adjust tilt, overlap beams
Issue 3: No DMX Signal
- Cause: Faulty cable, incorrect termination, wrong address
- Solution: Replace cable, use proper termination, check controller
Issue 4: Color Inconsistency
- Cause: Different color temperatures or old fixtures
- Solution: Use RGB calibration, replace aging bulbs
7. FAQs
Q1: How far should cyc lights be from the backdrop?
- Ideally, 4–6 feet apart for LED fixtures; distance depends on beam angle and stage size.
Q2: Can I use LED cyc lights for a large stage?
- Yes, but you may need more units for even coverage. Rasha Professional LED cyc lights scale efficiently for large productions.
Q3: How do I connect multiple cyc lights to a DMX controller?
- Daisy-chain the DMX cables, assign unique addresses, and verify signals on the controller.
Q4: What safety measures should I take while installing cyc lights?
- Secure mounting, avoid overloaded circuits, manage cables properly, and use protective gloves for hot fixtures.
Q5: How do I prevent hotspots on my stage backdrop?
- Overlap light beams, adjust tilt angles, and ensure even spacing of fixtures.
8. Conclusion
Properly setting up CYC lights is crucial for professional stage productions. By following this step-by-step guide, you can achieve smooth, uniform illumination, effectively control color and intensity, and avoid common setup pitfalls. Rasha Professional - professional stage lighting and manufacturer provides reliable fixtures and expert guidance to elevate any stage production.
Remember, safety and planning are key. With careful measurement, positioning, and DMX configuration, you can transform your stage lighting and create visually stunning performances every time.